I am looking forward to this weekend so much, as the son of some very close friends will be getting married and I can't wait to see the bride in her dress (yes I am a sucker for romance and all the pomp and ceremony of weddings!).
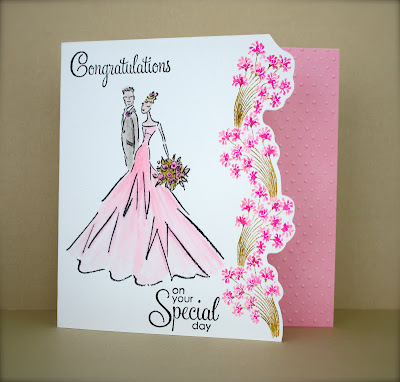
So today's card is to inspire you if you want a wedding card that has a bit of colour!
I began by colouring the flower from 'Fanciful' 40-100 with Tombow markers, I then spritzed with water before stamping and cut around the outside edge of the petals. I then cut a strip of 'Rose Garden' 14-001mix and match cardstock and embossed with Provocraft Swiss Dots embossing folder and adhered to the inside edge of the card.
The 'Bride and Groom' 4167K was then stamped and water coloured using Tombow and Tim Holtz distress marker pens.(I think his suit jacket looks fab using Pumice Stone).
The sentiments were then added using 'Gratitude' 30-105.
Hope you all have a wonderful weekend.
Hugs Cathy
x
Friday, 6 July 2012
Thursday, 5 July 2012
Rockin Rocking Horse
At the beginning of the week, I mentioned how I liked to make things that move and today is no exception, as soon as I saw the 'Mimi At Play' 30-111 transparent stamp set I just knew I had to make a card that rocked!
Mimi was paper pieced and her hair and face coloured with Copic markers. I then added the sentiment from 'Wishes' 30-103 and grounded her with the 'Plus Deco Rush' roller DC-016-4 (tip make sure you use the roller on a flat surface otherwise the tape will split). To get the rocking shape on the bottom and sides of the card I used the Spellbinders Grand Ovals to partially cut the card.
Thank you for visiting me today, hope you are having a great week.
Hugs Cathy
x
Wednesday, 4 July 2012
Flying Paper Butterflies
I love things that move when it comes to paper craft and recently I came across this blog post showing you how to create a flying butterfly and just had to have a go! I think they are a wonderful surprise to incorporate into one of my cards, I have adapted it so that I can use Penny Black stamps, there is also a little video with the butterfly flying (mine is not perfect as I could not get the silicon rubber bands).
And here is the card that I put my surprise butterfly into.
And here is the card that I put my surprise butterfly into.
Materials:-
Penny Black 'Soft Wings' 40-099, 'Breezy' 40-111
Other Memento Cantaloupe, Bamboo Leaves, Pistachio ink, SRM Smile sticker, Design Memory Craft Faber Castell 'Cobalt Blue' 143 & 'Cobalt Turquoise'153 Big Brush Pens, 'Gold Pitt artist pen', Fabric Flowers, Pearl Vintage buttons (coloured with Copic YR15 pen)
How to:- Repeat stamp breezy with different shades of Memento ink and then cut around the top portion of leaves. Add fabric flowers to bottom, colour buttons with Copic Marker and add to centre of flowers. Stamp Soft wings onto scrap card and colour with Design Memory Craft Faber Castell pens, cut out and mount onto card with 3d foam pads. Add sticker to top right corner of the inside of the card to finish.
Here is a closer look at the flying butterfly that was placed inside the card
Instructions for the flying butterfly can be found on 'this website'
I adapted it by making the body longer and used the soft wings butterfly, I wanted to create wider wings to aid flying so I outlined the butterfly with a sharpie marker pen, the butterfly was coloured with the same Design Memory Craft Faber Castell Big Brush Markers as the main card and highlighted with Copic white. The secret to getting them to fly lies with using the right sort of rubber band. There is an alternative method of creating flying butterflies that can be found 'here', here is my butterfly using this method, again adapted to use Penny Black stamps rather than template.
This butterfly from the transparent set 'Social Butterfly'30-116 was also coloured using Design Memory Craft Faber Castell Big Brush Markers and Pitt artist pens, colours used 'Pale Geranium Lake' 121, 'Deep Scarlet Red' 219, 'Dark Chrome Yellow' 109 and 'Orange Glaze' 113.
I hope my blog has set your heart a flutter today and that you will have a go at flying butterflies.
Hugs Cathy
x
Tuesday, 3 July 2012
Baby Feet from hands!
Today I thought I would share with you a neat trick that I learnt years ago, that just requires a bit of ink or paint to create a Baby foot. I also thought this idea would be perfect for this week's CAS-ual Friday challenge HERE, using two circles!
This is how you make a print of a baby's foot, curl your hand into a fist and ink the side (I used Tsukineko Brilliance Pearlescent Sky Blue ink for this) as below, then stamp onto card.
I then inked my little finger and added toes, voila your baby foot emerges!
Once this was finished I then cut a circle using Spellbinders nesting circles and a corresponding frame from 'Clear Skies' 10-001mix and match cardstock (this card is a perfect match for Tsukineko's Blue Sky Brillance ink), stamped the sentiment onto another circle using Penny Black's 'Kate' upper case 20-005 and lower case 20-006 .
This was then mounted onto a panel of card stamped with 'Allover Pattern' 40-109 using Brilliance ink. To finish off the panel was mounted onto a 'Clear Skies' 10-001card blank and Baby blue liquid pearls and twine used to accent.
I just love how the baby foot has a skin like texture using this method.
Thank you for visiting me today and for taking the time to leave such encouraging comments, they really mean a lot to me.
Hugs Cathy
x
Monday, 2 July 2012
Origami Blooms
Do you ever look at your craft stash and think, I really must start using some of this stuff up!! I had some origami scraps of paper on my desk and some old card blanks that were just taking up space and so I thought I would make a quick card, here is what I came up with.
I concertinaed the origami paper and joined the edges with glue then flattened to create rosettes. I then stamped the string from the balloon in the transparent set 'Sweet Wishes' 30-104 with Versafine Black ink and added the rosettes on top . The purple pearls were then added to the centre of the rosettes and the sentiment stamped on the bottom from 'Gratitude' 30-105.
I cut the front edge of the card using Spellbinders Classic Postage edgeability and stamped the inside edge with 'Puzzle Parts' 30-114 using Versacolour Fresh Green ink.
I love the fact that this card uses up the thin strips of left over origami paper, and that it was so quick to make too!
I am entering this card in this weeks two circles challenge over on the CAS-ual Friday blog, details of the challenge can be found here. Thanks for visiting me today and for all the comments you take the time to leave, they mean so much to me.
Hugs Cathy
x
Subscribe to:
Posts (Atom)


